Tuesday, March 29, 2011

Blueberry and White Chocolate Chip Cookies

The groundhog lied. Like, big time lied. If you've seen Spring, please send her to NYC, because it's still wintry here. The high temp on Sat was 34. THIRTY-FOUR! As you can imagine, I've gone a little bonkers. I even refused to run outside because I'm tired of bundling up. Me, who ran a half marathon in 3 degree wind chill, can't stand the thought of running in 30 degree weather at THE END OF MARCH. That's it, I'm moving back to TX.

One saving grace has been a lovely art installation on Park Ave, just a couple of blocks away from where I work.
Every time I see these, my spirits soar.
There's something uplifting about seeing giant roses. (And cute giant lady bugs!)
This whimsical "love letter to NYC" is by Will Ryman. Read more about The Roses on Huffington Post.
Another thing that has helped lift my spirits this long winter is good food, wine, and conversation. Which reminds me, I MUST share with y'all that I saw Martha Stewart at the Little Owl, where I had the pleasure of dining last Thursday. Seeing her there made me know I was in for some great food. (And man, was it!)

Speaking of good food, these Blueberry and White Chocolate Chip Cookies have helped in the cold days here in NYC. (They have lemon and nutmeg in them. A great pick-me-up!)
Blueberry White Chocolate Cookies (adapted from Blisstree)

½ cup unsalted butter
½ cup shortening
¾ cup sugar
¾ cup brown sugar, packed
2 eggs
1 teaspoon vanilla
2 tablespoons grated lemon peel
2¼ cups all-purpose flour
¼ teaspoon freshly grated nutmeg
1 teaspoon baking soda
½ teaspoon salt
1 cup dried blueberries
1½ cups white chocolate chips

1. Preheat oven to 350°F. Line a cookie sheet with parchment or silpat (if you like using either).
2. Cream together butter, shortening, and both sugars. Add eggs, vanilla, and lemon peel; beat until well blended.
3. Mix dry ingredients together; stir into creamed mixture. Blend well; add dried blueberries and white chocolate chips. (Erika's Extra: I used my Oh! Nuts dried blueberries. So flavorful!)
4. Drop by generous, rounded teaspoonfuls onto parchment baking sheets. Keep cookies about 2″ apart. Bake 8–10 minutes, removing from oven when just barely done.
5. Cool on pans 5 minutes; remove to cool

Yields 4-5 dozen depending on size and how much dough you eat

Erika's Extras: I felt like the amount of white chocolate chips was a little overbearing. I ended up having so many at the bottom of my mixing bowl. I would go with 1 cup of white chocolate chips.
Bake well and prosper!

Tuesday, March 22, 2011

Healthy Alternative Blueberry Muffins

I was so happy to receive an invitation a couple of weeks ago to sample some of Oh! Nuts products. I decided to get golden raisins, raw almonds, and dried blueberries. I chose to use the dried blueberries first and found a lovely blueberry muffin recipe.
*Side note: I couldn't stop eating these dried blueberries! They were so delicious and flavorful. Check out more products here: Oh! Nuts

On allrecipes.com I found a healthy version to the normal blueberry muffins. I have to say that I really enjoyed the combination of blueberries and whole wheat.

PS CBS has a new pilot show, "Rookies", that has been filming outside my apartment. It stars Leelee Sobieski. I would take pictures but it's getting a little redundant. First the Bollywood movie, then the Megan Fox movie. I might as well change my blog's surtitle to "Making it work in Hollywood²."
Applesauce Blueberry Wheat Muffins (from allrecipes.com)
Ingredients
1 cup all-purpose flour
1 cup whole wheat flour
3 teaspoons baking powder
1/2 teaspoon salt
1/4 cup milk
3/4 cup applesauce
1/4 cup vegetable oil
1/2 cup dried blueberries

Directions
1.Preheat oven to 375 degrees F (190 degrees C). Lightly grease a muffin pan, or use paper liners.
2.In a large bowl, mix together all-purpose flour, whole wheat flour, baking powder and salt. Make a well in the center, and pour in applesauce, milk, and oil. Stir until moistened. Fold in dried blueberries. Fill muffin cups 3/4 full.
3.Bake in preheated oven for 20 to 25 minutes, or until a toothpick inserted into the center comes out clean.

Erika's Extras: Add white sugar to the tops of the muffins to make a little less healthy. :)
Bake well and prosper!

Monday, March 14, 2011

White & Semi-sweet Chocolate Chip Cookies with Caramel Bits

My last two posts referenced items I brought from my parents' home in TX to my tiny apt in NYC. I talked about my grandmother's mixing bowls and my mother's sifter. Well, I also brought back something I used to own and "bake" with.
When I found this in a box I squealed with joy. When I was little I loved putting on my "Little Cook" apron. My mom would give me some pie dough to use my "to0ls" on. It was perfect bliss. Especially when my mom's pies came out of the oven.

Well, the apron is a little short on me now, but who knows. Maybe I'll use it and the tools once in awhile. You know...to make sure they still work and stuff. Yeah... 
Anyway you look at it, one cannot deny that I don't have a kid's attitude as well when it comes to making cookies. I decided to experiment with a child's joie de vivre and created my version of a toffee chocolate chip cookie that I found on tastespotting. The cookies weren't as soft as I like cookies to be, but the flavor was incredible!
White & Semi Sweet Chocolate Chip Cookies with Caramel Bits (adapted from Rebel without a Sauce)
*Makes around 20 medium sized cookies
½ cup sugar
½ cup light brown sugar
½ cup (1 sticks) butter, softened
1 egg
1 tsp vanilla
½ tsp baking soda
½ tsp salt
1½ cups all-purpose flour
¼ cup semisweet chocolate chips
¼ cup white chocolate chips
½ cup caramel (chopped into quarters or smaller)

-Preheat oven to 375°f/190°c and prepare a baking sheet with parchment paper. (Use parchment paper or you'll have a sticky mess to deal with.)
-Add sugar, dark brown sugar, butter, eggs and vanilla in a bowl and beat whisk until smooth.

-Add baking soda, salt and flour to the sugar mixture and *whisk together until smooth.
-Fold in chocolate chips.
-Create a tablespoon full or cookie scoop full of the dough and press a couple of the caramel bits into the middle area of dough. Make sure no caramel is exposed to the sides/bottom becuase the caramel will ooze out and burn on the cookie sheet.
-Drop the dough onto baking sheet approximately 2 inches apart.
-Bake for 5 minutes, rotate the baking sheet and then bake for another 5 minutes.
-Remove from the oven and allow to cool on baking sheet for 1-2 minutes before transferring to a wire rack to cool completely.

(I had to bake my cookies for about 12-15 minutes.)
Bake well and prosper!

PS My mom asked if I could share a link of my opera singing on my blog. In honor of her request, I've made a silly slideshow with me singing Que fais-tu from Romeo and Juliette. If you've made it this far to the bottom of my post, then this treat is for you and your diligent reading! http://www.youtube.com/watch?v=HOtqXmDsApo

Tuesday, March 8, 2011

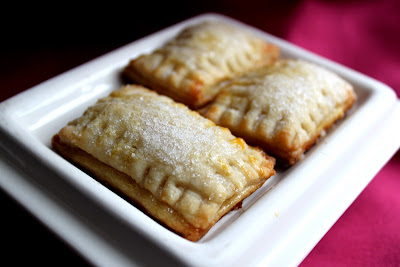
Jameson Marmalade Pockets

Have I ever shared that my mother is a great baker and that's where I get my baking genes from? She got it from her mother who not only made the most glorious pies but also had a sweet tooth to rival mine.

When I went home a couple of weeks ago I once again thanked my parents for going to all my basketball games, choir concerts, and plays that I was involved with during high school. It's very mind blowing to me that they worked full time and spent their precious free time supporting me and my siblings in our extra curricular activities.

When I said this to my mom, she replied with, "And don't forget. I also had a meal on the table every night." This is just another reason why the Wonder Woman "joke" worked for her. My sister bought her some Wonder Woman cards years ago to be silly, but it really seemed to match my mom well. Other Wonder Woman merchandise has been given since then and when I was walking in SoHo this past weekend, I couldn't help but snap a picture of this. Too bad it's not for sale, because I know who I'd give it to!
Another item I kept from cleaning out boxes at my parents' house was this sifter. I know, I know. I already have a sifter. But I grew up seeing my mom use this one and helping her by sifting the items in this cute sifter. I HAD to keep it.
Maybe using this sifter will give me Wonder Woman powers too...
Jameson Marmalade Pockets (adapted from Authentic Suburban Gourmet)
I've had this marmalade unopened in my fridge since my trip to Ireland this past summer. (Funny side note: my mom bought this too!) Finally decided to use it for the jam in these treats. (Any jam will do.)

Ingredients
2 ½ C Flour
3 T Sugar
1 C Butter (2 sticks), chilled and cut into pieces
2 Egg yolks
¼ C Ice water

Additional
Jam, Jelly, or Marmalade
1 Egg for brushing top of pastries
Course sugar for sprinkling on top

Use a food processor, combine the flour and sugar. Add the butter pieces and process until the mixture is crumbly. Lightly beat the eggs and add to the mixture and pulse until combined. Then stream the ice water into the processor and continue to process until the dough holds together. Remove and divide the dough into two balls and flatten. Wrap with plastic wrap and chill in the refrigerator for at least one hour.

To assemble:
Use a large cutting board and generously flour. Lay one of the disks on the floured board. Place plastic wrap on top and begin to roll out to a thin sheet of dough. You will want to rotate the dough after a few rolls with the rolling pin. Use a square cookie cutter that is 2 inches in diameter or I used a ravioli cutter of the same size.

Each jam pocket will take two pastry squares. Lay one square on the cookie sheet lined with parchment paper or a silpat. Place about 1 heaping teaspoon of the fig jam in the middle. Fill a small bowl with water and use your index finger to dampen the top piece of dough and gently lay on top of the jam filled dough. Carefully press the edges all away around without letting the jam come out. To seal use a fork to press all around the pastry and using a pastry brush, give a gentle wash of the egg on top. Sprinkle with the course sugar.

Bake at 375 degrees for 15 minutes. Remove and let cool on a wire rack. Keep in a airtight container.
Bake well and prosper!

Tuesday, March 1, 2011

Almond Joy Cake

I've been on a mini hiatus from my beloved dessert blog. Not sure if you noticed... But don't worry, I'm back! I was swept up in a whirlwind of travelling to Texas which involved sorting through my childhood memories, having a yard sale (good bye stuffed animals!), running a half marathon, and hanging with friends and family. It was fun and busy. I had a brief respite from the busy while on the plane back to NYC, but once I landed I hit the ground running.

I finally had time to bake this past Saturday. I decided to make a cake for an Oscar's Party (seeing last year's was such a success). Unfortunately I was so exhausted from all my activities that I didn't go to the party and ended up sharing with coworkers on Monday. (There are some perks of working with me. Only some though.) ;)

A couple of happy points about the cake:

1. I used my grandmother's mixing bowls that I brought back from TX. (I'm in love with them.)
2. I made a bundt cake version of the cake.
3. Which meant that this already messy cake was even messier! 
4. Mess!
5. Almonds scattered on floor messy mess! 
6. A scrumptious and pretty cake.
Almond Joy Cake
I used the chocolate cake recipe from my Blog Birthday Cake
Chocolate Cake (from allrecipes.com)
Ingredients
1 cup margarine
1 3/4 cups white sugar
3 eggs
1 1/2 teaspoons vanilla extract
1 1/2 cups milk
2 1/2 cups all-purpose flour
6 tablespoons unsweetened cocoa powder
1 1/2 teaspoons baking soda
1 teaspoon salt

Directions
Preheat oven to 350 degrees F (175 degrees C). Grease and flour a 9x13 inch pan. Sift together the flour, cocoa, baking soda and salt. Set aside.

In a large bowl, cream together the margarine and sugar until light and fluffy. Beat in the eggs one at a time, then stir in the vanilla. Beat in the flour mixture alternately with the milk, mixing just until incorporated. Pour batter into prepared pan.

Bake in the preheated oven for 40 to 45 minutes, or until a toothpick inserted into the center of the cake comes out clean. Allow to cool.
 
For the topping, I used a recipe from cooks.com
Ingredients
14 oz. shredded coconut
1 1/2 c. sugar
1 1/2 c. chocolate chips
1 c. evaporated milk
1 c. sugar
24 lg. marshmallows
1 stick butter
1/2 c. evaporated milk
Toasted almonds

While cake is cooking, mix the following: 1 cup evaporated milk and 1 cup sugar. Bring to a boil and remove from heat. Add marshmallows. Stir until dissolved. Add coconut. Pour over hot cake until completely covered.

Heat the following until it boils: 1 1/2 cups sugar, 1/2 cup evaporated milk and butter. Remove from heat and stir in 1 1/2 cups chocolate chips until melted. Pour over cakes and top with almond chips.

Erika's Extras: There will be more topping than needed for most cakes. Just save the toppings to use on vanilla ice cream. Just warm up a little bit and add on top. Mmmm!

Extra tidbit: I shared a piece with my neighbor and she loved it so much she had me make it for her mom's birthday. Here it is in circular form. Still gorgeous!

Bake well and prosper!