Showing posts with label Chocolate. Show all posts

Monday, July 7, 2014

Chocolate Cherry Coconut Oatmeal Cookies

Are you like me? Do you get excited when it is cherry season and grab a huge bag  of them? Then you realize that it actually takes awhile to get through that bag? And then you start to worry about how you'll finish them before they go bad?
 
If you aren't like me, well, I guess I applaud you. If you ARE like me, then put your worries aside. Cherries go great in desserts. This is a universal truth. Like ketchup makes everything taste better. Except Ketchup.
Well, here in Pittsburgh I finally got into a kitchen with an oven. (THREE ovens actually!) It was so nice to be back in a kitchen and creating delicious creations like these cookies. I found a recipe and added some things and took out others and the results were magic. Using cherries in their raw form (not dried) brings a pop of freshness and juice when you bite into these. The mixture of coconut, chocolate, and oatmeal makes for a wonderful base to deliver the tart/sweetness of the cherry. All the folks in my Summerfest program here in Pittsburgh agreed that these were amazing.
 
So, if you have cherries that need to be used, try this great recipe!
Chocolate Cherry Coconut Oatmeal Cookies (adapted from What's Gaby Cooking)
2 sticks unsalted butter, softened
1 cup light brown sugar
1/2 cup white sugar
2 large eggs
2 teaspoon pure vanilla extract
2 cups all-purpose flour
1 teaspoon baking soda
2 teaspoon sea salt
1/2 teaspoon baking powder
3/4 cup shredded coconut
1 cups old-fashioned oats
2 Tablespoons chocolate powder (hot chocolate mix works)
1 cup chocolate chips
1 cup diced cherries

In a large bowl, combine the butter and sugars via stirring or electric mixer.. Mix together for 2 minutes until the sugars are incorporated. Add the eggs one at a time, followed by the vanilla extract. Add the flour, baking soda, sea salt and baking powder and slowly combine, making sure not to over-mix the batter. Add the coconut, oats, chocolate powder, chocolate chips, and cherries. Gently fold them into the dough. Refrigerate batter while oven is heating.
 
Pre-heat oven to 350 degrees. Line 2 baking sheets with parchment paper. Place small scoops of dough spread out 12 times onto each parchment lined baking sheet. Transfer sheets into over and bake for 14-16 minutes until the cookies slightly turn golden brown on the edges but are still soft and chewy in the middle. Remove from oven, transfer to cooling rack. Repeat process for remaining dough. Cool for a little bit and then enjoy!
Bake well and prosper

Tuesday, March 25, 2014

Spicy Chili Chocolate Cookies (gluten-free version)

The spice in these cookies are perfect for the cold days we keep having here in NYC. Have I mentioned that this winter's been a bad one? Oh yeah. I mentioned it here, here, and here. There doesn't seem to be an end in sight.
 
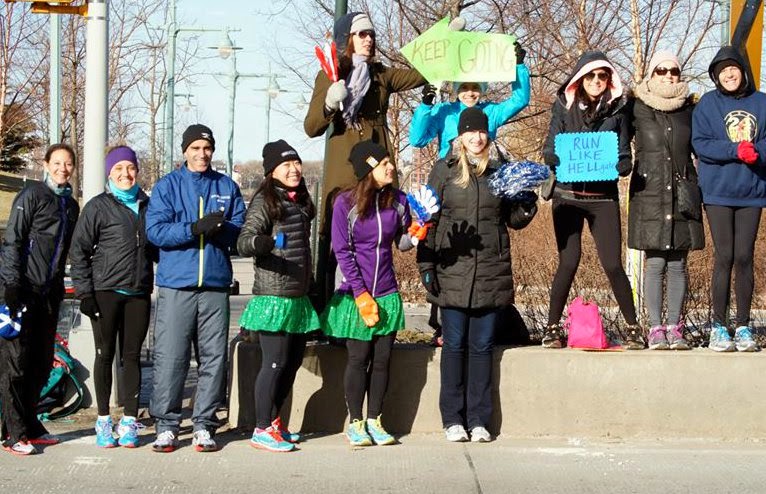
Two weekends ago I made these cookies to share with my fellow running team mates. A group of us cheered on other runners while standing out in the cold.
See how bundled up everyone was? Yeah. It was COLD.
 
But the chili dark chocolate mixed with cayenne pepper and cinnamon had a nice enough kick in it to help warm up whomever ate one (which was most of us.)
 
So, if it's still super cold where you are and winter seems never ending, consider making these cookies. (And if it's not, send warm weather my way and keep this recipe for next fall/winter.)
I used gluten free flour for these cookies and they turned out perfectly fine. Besides that change, I followed everything else called for in the recipe. The recipe can be found here: Completely Delicious
Bake well and prosper!

Tuesday, January 7, 2014

Raw Dessert: Chocolate Mousse Tarts with Cashew Cream

Happy New Year! Did you make a resolution? I had figured out one of my resolutions in the middle of December. I wanted to eat raw foods for all of Jan. But then I realized that I'll be visiting New Orleans in January, so I was a little behooved since I knew I'd be enjoying the traditional NOLA food (which is far from raw).
 
But then I realized that I could view every day as the start of a new year! Thus, on Dec 26, I started eating my raw foods diet and have been on it every day since (minus one dinner.)
 
It's been so helpful within the past couple of cold days to be eating raw foods. My skin usually gets really dry in the winter, but if I eat my raw foods diet of mainly greens, nuts, and fruits, my skin has no problem (even in this 5 degree weather). Yay!
 
A couple of months ago I discovered a wonderful raw food blog: This Rawesome Vegan Life. You guys should check it out. It contains tons of beautiful food and photography.
 
Anyway, I visited it again this past weekend to find a dessert and voila! I made this tart. I really like its creamy and sweet filling surrounded by a firm crust. Next time I think I would double the crust and mousse recipe and then put it all in a springform pan.
Chocolate Mousse Tarts with Cashew Cream (adapted from This Rawesome Vegan Life)Crust: (Erika's Extras: I would double this and put in a springform pan.)
3/4 cup oats, buckwheat groats or nuts
3/4 cup raisins
1 heaping tablespoon cacao powder
1 tablespoon of raw honey
1 teaspoon cinnamon (optional)
Lemon cashew cream:
1 cup soaked cashews
Juice from 1 lemon
1/4 of a banana, sliced
pinch of Himalayan pink salt
Chocolate mousse: (Erika's Extras: I would double this as well.):
1 avocado
1 cup dates
1 teaspoon vanilla extract
1-2 tablespoons cacao powder
1/2 cup water, more or less as needed
1 tablespoon melted coconut oil
 
To make the crust: pulse the oats, buckwheat groats or nuts in a food processor until they turn into crumbs. Add the rest of the ingredients and pulse until it all sticks together. Press into two lined tart tins and put in the fridge.
To make the cashew cream: blend all the ingredients until smooth. Set in the fridge.
To make the mousse: blend all the ingredients until smooth. Spread into the bottom of your tart crusts and cover with the cashew cream. Put back in the fridge overnight or for at least a couple hours. Dust with cacao and serve!
 
Erika's Extras: Make sure you have soaked cashews (which takes a couple of hours) before you start assembling. Recipe takes about 20 minutes to make and then a couple of hours to set.
Bake well and prosper!

Tuesday, December 10, 2013

Grasshopper Dessert

I'm not a picky eater, but there are some things I really can't stand. These foods go on my "will not eat" list.

Do you have a list like this? Foods that you refuse to eat because you find them disgusting?

Well, I already mentioned in this Beer and Pretzel Cookie post that I can't stand beer nor coffee. (Funny thing is that I worked at a coffee shop for 3 years in college and still can't stand the taste of coffee/espresso. Love the smell though!) One of the other two things I can't stand is J-E-L-L-O. Lastly, while I love chocolate and I love mint, I can't stand them together.
So obviously, this dessert is something I avoid like the plague. (Jello's involved as is mint and chocolate!)

However, the rest of my family loves this dessert. I've been meaning to make it for years just to post about it, but I just couldn't bring myself to deal with actually making it.

Thankfully, my mother made it during Thanksgiving week and I happily watched her in the kitchen and took photos.
I was amused and disgusted watching my mom cut the jello. It looks alive!
Transferring the jiggly jello requires a skillful hand.
If you aren't careful, you might end up with a mess. (Yay!)
All my family enjoyed this dessert and I enjoyed taking photos of it. Don't worry. I still got a dessert. My mom had homemade chocolate chip cookies on hand - my fave!

I must admit that when I was a kid I wish that I DID eat this dessert because I loved the glasses my mom served them in. I also loved how festive this dessert is. The green is perfect for Christmas. I'm sure this could be easily turned into red jello as well, but I am definitely not the one to experiment with jello and find out!
Grasshopper Dessert (adapted from my Mom's Best Recipes Cook Book)
Ingredients
1 6-oz lime jello
1/4 C sugar
2 C boiling water
1 1/2 C cold water
1/2 t peppermint extract
2 C Cool Whip

For Topping
chocolate shavings and extra cool whip

Dissolve jello and sugar in boiling water. Add cold water and peppermint extract. Take 1 cup of the jello mixture and chill until slightly thickened. Pour remaining jello mixture into 8-inch square pan and chill until firm. Blend Cool Whip into thickened gelatin mixture. Pour into 8 serving dishes. Chill until firm. Cut the jello in the pan into cubes and place the cubes onto the thickened gelatin. Garnish with Cool Whip and chocolate shavings.
Bake well and prosper!

Tuesday, March 19, 2013

Beer and Pretzel Cookies

To keep adhering to my New Year's resolution of baking outside of my comfort zone, I made these beer pretzel cookies.

I know what you're thinking: "But Erika, you bake cookies all the time." This is true. But I hate beer. Seriously. I hate the taste and smell of it with a passion.
Therefore, I introduced beer into my kitchen. I've never bought a bottle of beer from a bodega before. Mike's Hard Lemonade, sure. Beer? Ew, no!
This stout even had hints of organic Mexican coffee in it. And guess what. I also despise coffee.

So there I was in my kitchen having to boil this stout down to a syrup. The smell made me gag a couple of times. I've never gagged before from smells emanating from my kitchen. What a weird experience!
I actually didn't mind eating the cookie dough. However, I didn't like these cookies right out of the oven because the beer flavor was stronger. Once they had cooled off I had no problem eating them. (I made special non beer frosting for my own private stash.)
 
These were a hit for St. Paddy's Day. If you're a big beer and pretzel fan, I highly recommend this recipe.
Beer and Pretzel Cookies (found at Cookies & Cups)
Ingredients
1 (12 oz) bottle stout, minus 2 Tablespoons reserved for frosting
1 cup butter
1 1/4 cup light brown sugar
1/2 tsp espresso powder or 1 tsp ground espresso (Erika's Extras: I didn't use this ingredient)
2 eggs
1 tsp baking soda
1 tsp kosher salt
2 cups flour
2 cups quick oats
1 cup coarsely crushed pretzels
1 cup chocolate chips
 
Directions
Reduce beer (minus 2 Tablespoons) in saucepan over medium heat until there is only 1/8 cup left. This will take 25-30 minutes. Watch the beer on the stove, as it will foam up easily at the beginning. Remove from heat and allow to cool. (Erika's Extras: Feel free to stir occasionally, but not too often.)
Cream butter, brown sugar and espresso powder together until light and fluffy.
Add in eggs and reduced stout and mix until combined.
Turn mixer to low and add in baking soda, salt, flour, and oats. Stir together until just combined.
Finally add in pretzels and chocolate chips, stirring until evenly incorporated.
Let dough chill for at least 2 hours, or overnight. (Erika's Extras: I chilled my dough for around 6 hours and found the dough to be very tough to deal with until it was a little warmer. I would chill for only 2 hours.)
 
Frosting
In small saucepan heat butter and heavy cream over medium heat until just boiling.
Remove from heat and whisk in chocolate chips until smooth.
Add 2 Tablespoons reserved stout, stir to combine.
Chill frosting for an hour or two, until spreadable consistency.
 
Cookies
Preheat oven to 350°
Drop by heaping tablespoon size onto a parchment lined baking sheet, pressing dough slightly, so cookies aren't so rounded. (Erika's Extras: I rolled my dough into a ball and then pressed it down onto the parchment paper.)
Bake 9-10 minutes until golden around edges.
Transfer to a wire rack to cool.
When cookies are cooled and frosting is ready, spread on a teaspoon sized amount onto each cookie and top with a pretzel twist
Bake well and prosper!

Thursday, January 24, 2013

Chewy Double Chocolate Whiskey, Cherry, Macadamia Nut Cookies

Whew! That is a mouthful of a title. I had a recipe from online that I kept changing/adding things to and thus the long recipe name.
How is every one's January going? This week most of America had incredibly cold weather and NY was no exception. The past couple of days have been below freezing with single digit wind chill.
I grew up in TX. There wasn't much cold weather and hardly any snow ever so I just thought if the temperature reached below freezing it would snow. As a 7 year old this made sense to me. I guess I never figured out that there would need to be clouds with rain as well...

If it's extremely cold where you live I have a suggestion. Bake bake bake! The oven will keep your place warm and smelling great. (And if you make these cookies, maybe have a little side drink of whiskey to keep your insides warm for a little bit!)
Chewy Double Chocolate Whiskey, Cherry, Macadamia Nut Cookies (adapted from Delicieux)
Ingredients:
(Erika's Extras: I bought a kitchen scale for Christmas and used it for the first time with this recipe!)
150g of dark chocolate, broken into pieces
50g of butter, cut into slices
80g of plain flour
1/4 tsp of baking powder
2 eggs
250g of caster sugar
1 tsp of vanilla extract
100g of dark chocolate, chopped
1 cup of macadamias chopped
3/4 cup of dried cherries (optional)
2 tablespoons of whiskey

Directions:
1. Preheat the oven to 350 degrees Fahrenheit and line a baking tray with baking paper.
2. Soak cherries in whiskey. (This step is optional if you don't use cherries.)
4. Melt the chocolate pieces and butter in a double boiler over a stove.
5. In a mixer, beat together the eggs, sugar and vanilla extract until thick and pale.
6. Pour the melted chocolate into the beaten eggs and sugar and stir thoroughly before adding the whiskey and cherries.
7. Sift in the flour and baking powder and stir thoroughly before adding the chopped chocolate, chopped macadamias and mix until combined.
8. Using a mini ice cream scoop, scoop the mixture onto the lined baking trays. The cookies will flatten out when baked.
9. Bake in the oven for 8 to 9 minutes and cool on the tray before transferring to a cooling rack. If you put the cookies onto the cooling rack while hot they will become marked by the wires from the rack.
Bake well and prosper!

Wednesday, December 12, 2012

Cherry Hazelnut Nutella Fudge

Here's another recipe I made for my birthday party. I just had to have something chocolaty at my birthday!
 
This is the third time that I've made fudge. Each time keeps getting better. This is my favorite by far! And all my guests loved it.
My birthday guests also loved the "party favors" I made. Mustaches on the end of candy canes!
And I must admit that I had a lot of fun making them. I saw a post on craftgawker and then found out how to make them via Morena's Corner. Pretty simple. Get candy canes and brown pipe cleaner aka bump chenille sticks. Hold two together and cut in the middle. Take the halves that match each other in length and twist the ends together. Then twist the middle onto the end of a candy cane and use any type of glue to glue on. Style as you wish. (For best shape, curl the ends around a pencil.)
 
Back to the fudge: The combination of dried cherries, hazelnuts, and nutella with some sea salt on top was just perfect. If you want to impress guests, try this easy and yummy fudge recipe.
Cherry Hazelnut Nutella Fudge (found on Annie's Eats)
½ cup hazelnuts
1 (14 oz.) can sweetened condensed milk
1 tsp. vanilla extract (or 1 tablespoon coffee-flavored liqueur)
8 oz. bittersweet chocolate, finely chopped
1 cup chocolate-hazelnut spread, such as Nutella
3 tbsp. unsalted butter, at room temperature
½ tsp. coarse sea salt flakes, plus more for sprinkling
½ cup dried cherries, coarsely chopped
 
Preheat the oven to 250˚ F. Place the hazelnuts on a rimmed baking sheet. Bake for 20 minutes until lightly toasted and the skins have cracked. Transfer the hazelnuts to a clean kitchen towel. Fold half of the towel over the top of the hazelnuts and roll them around gently to help remove the loosened skins. Transfer the skinned hazelnuts to a cutting board and chop coarsely. (Erika's Extra: I used a paper towel and had a hard time getting the skins off. Keep with it though. They will come off!)
 
Line an 8 x 8-inch baking pan with foil and grease lightly with butter. Set a heatproof bowl over a pot with a few inches of simmering water (do not boil). In the bowl, combine the sweetened condensed milk, vanilla, chocolate, Nutella, butter, and salt. Heat, stirring occasionally, until the mixture is fully melted and smooth.
 
Remove the bowl from the heat. Add the toasted hazelnuts and dried cherries to the bowl and fold in until evenly combined. Pour the mixture into the prepared baking pan and spread into an even layer. After it has cooled for a few minutes, sprinkle lightly with additional sea salt. Cover and refrigerate until firm, about 3-4 hours.
 
Use the foil to lift the fudge from the pan. Remove and discard the foil. Use a large chef’s knife to slice the fudge into 1-inch squares. Store in an airtight container.
Bake well and prosper! 

Monday, December 10, 2012

Salty & Sweet Chocolate Chip Oatmeal Cookies

This post is long overdue. I promised the costumer from my last opera gig that I would post these last week. Whoops. The costumer loved the salt on these mixed with the sweetness of the sugar. I really should have posted it sooner. She did such a lovely job on my costume! (In the beginning it was awful and needed much TLC and that's what she gave it!)
That was my last opera gig of the year. Now I'm much less busy and just singing Christmas music (which is always fun). Oh, and I baked up a storm this past weekend. More on that later this week. I promise!
Salty Sweet Chocolate Chip Oatmeal Cookies (found on My Kitchen Addiction)
(Adapted from King Arthur Flour Cookie Companion, makes about 4 dozen)

1 cup unsalted butter (2 sticks), softened
1/2 cup granulated sugar
1/2 cup dark brown sugar, lightly packed
1 egg
1/4 cup light corn syrup
1 teaspoon vanilla extract
3 cups old fashioned rolled oats
1 1/2 cups all purpose flour
1 teaspoon baking soda
1/2 teaspoon salt
1 package (about 12 ounces) milk chocolate chips
1/2 cup raw sugar (Erika's Extras: I used organic sugar which was nice, but I think sugar in the raw is a much better choice)
1 1/2 tablespoons Kosher salt

Cream together the butter, granulated sugar, and brown sugar in a large mixing bowl. Add in the egg and beat until the batter is smooth. Add the corn syrup and vanilla extract and beat until incorporated.
In a separate bowl, whisk together the oats, flour, baking soda, and salt. Gradually add the dry ingredients to the creamed mixture, mixing on low until the batter comes together. Stir in the chocolate chips. Refrigerate the dough for at least 30 minutes.
Meanwhile, preheat the oven to 375°F and lightly grease your cookie sheets (or use a silicon liner or parchment, if you must). In a small dish, combine the raw sugar and Kosher salt.
Roll the cookie dough into 1-inch balls and then roll each ball in the sugar and salt mixture. Place each cookie on the baking sheet, and then press down with the palm of your hand to slightly flatten the cookie.
Bake for 8-10 minutes, until the edges of the cookies are just golden and puffed up (don’t overbake or the cookies will not be as soft and chewy). Cool on the baking sheet for about 5 minutes and then transfer to a wire rack to cool completely.
Bake well and prosper!

Monday, November 26, 2012

Soft Nutella Thumbprint Cookies

Thanksgiving is over here in America. So, is everyone ready for Christmas?
 
It seems like this time of year flies by with holidays, parties, my birthday, New Year's, and tons of baking. I am always ready for Christmas (whether I have my cards and gifts out on time or not.)
 
This weekend I started my first dose of holiday cookie baking. I took a recipe online and made some adjustments to make the Nutella flavor really prevalent. If I had green and red sprinkles, I would have made these a little more festive. But sprinkles or not, they sure tasted good and were even better with a glass of milk!
Soft Nutella Thumbprint Cookies (adapted from Kirbie's Cravings)
Ingredients
2 1/2 cups all-purpose flour
1 tsp baking soda
1 cup butter, room temperature
3/4 cup packed light brown sugar
1/4 cup white sugar
1 (3.4 ounce) packages instant vanilla pudding mix
2 eggs
1 tsp vanilla extract
1/2 cup+ Nutella
2 cups semisweet chocolate chips

Directions
1. Preheat oven to 350 degrees F. Sift together the flour and baking soda and set aside.
2. In a large bowl, cream together the butter, brown sugar, and white sugar until creamy and fluffy.
3. Beat in the instant pudding mix until blended. Beat in the eggs and vanilla.
4. Mix in the flour mixture at low speed. Stir in the chocolate chips until fully incorporated into the dough.
5. Make balls of cookie dough about 1 1/2 inch in diameter and place on cookie sheets lined with parchment paper or silpat mats, spacing dough balls about 2 inches apart..
6. Bake for about 7 minutes and then carefully remove from oven. Mark each cookie in the middle with a spoon and then fill indents with Nutella.
7. Replace cookie sheets in the oven and bake from 3-5 minutes more. Let cookies cool on cookie sheets before removing.
Bake well and prosper!